If you are considering planting hydrangeas this spring, this post is for you. I am sorry to tell you that although we are always tempted to plant in the spring, when it comes to hydrangeas, that is not the best time. The soil is generally cool if not cold, and it might be too wet from spring rains. Be that as it may, here are some suggestions about planting hydrangeas in the spring.
PREPARE THE NEW SITE FOR YOUR PLANT
Once you have chosen the best site based on your hydrangea’s needs (allowing for sunlight, soil, and moisture conditions), check soil temperature. The easy way to do that is to use a simple kitchen thermometer and stick it into the soil. You want the temperature to read at least 60 degrees 4 inches down (where the roots live). If that’s not the case, you can warm up the soil by laying down some black plastic to concentrate the sun’s heat where you need it. Be patient and wait until that soil temperature is warm enough to keep those roots happy.
It’s also a good idea to do a soil test to ensure you have the right conditions for your plant. Analyze your results to get clear on what amendments you may have to add to bring that space up to standards.
NEXT DIG THE HOLE
After that, dig the receiving hole to be sure it can accommodate the rootball. I can’t tell you how many times I have hit “foundation” rocks (read GINORMOUS) that have thwarted my planting plans!
If you’re okay on the receiving end, fill the hole with water and let it drain to be sure your drainage is adequate. If it empties in less than an hour, your hydrangea will either die of thirst or you will be exhausted trying to keep it hydrated. This rapid drainage is an indication that your soil isn’t water-retentive and needs to be amended to hold moisture. Or maybe you need to pick a different site.
If it takes a few hours to empty, you should be okay to plant your hydrangea into this hole. If it takes a day or more to empty, your soil is much too heavy in that spot. You will need to seriously amend it or find a better site.
PLANTING HYDRANGEAS AND AMENDMENTS
When planting (anything!) I always recommend using some sort of mycorrhizae additive in the fill soil. It helps establish roots and reduce transplant shock. Your local independent garden center can guide you to these additives. There are many choices on the market. Simply follow the label directions to help your hydrangea make a successful transition.
The only other amendments to add at transplant time are compost or composted manure and whatever you have decided to apply to adjust the pH, if at all.
PREPARE THE HYDRANGEA THAT YOU’RE PLANTING
Water the plant thoroughly before moving it to ensure that it is well hydrated.
PLANTING HYDRANGEAS: MAKE THE MOVE
By now your newly dug planting hole should be ready to accept its new tenant. The water drainage has been tested, the proper amendments have been added based on your soil test, and your plant is good to go.
PUDDLING IT IN
Now “puddle the plant in.” “Puddling in” is a bit of a throwback to your childhood mud-playing days, except now it’s a useful planting technique. Put your plant into the very wet hole that has just finished draining. The hole might even have some water still in the bottom of it—with some of the backfill soil. Then water the plant and the backfill lightly to get a good muddy mix going. Tamp it slightly to remove the air pockets. Let that set for a bit, and then repeat that process until the plant is completely in the ground. It’s OK if there is a bit of water sitting at its crown. That water should slowly percolate down to the roots. This puddling process not only waters the plant well, but also eliminates air pockets during and after backfilling.
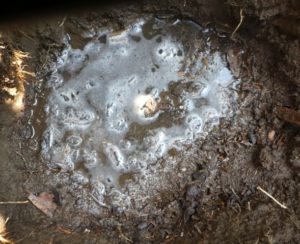
Adding water to the receiving hole for planting a hydrangea
Make sure the plant doesn’t sit deeper in its new hole than it was before you planted it. Amendments – if at all — like compost should be thoroughly integrated into the backsoil and the planting hole along with the native soil. No peat moss, Holly-tone®, Miracid®, or anything else should be added at this time.
Create a firm soil collar about 2 inches high and about 4 inches out from the base of the plant. This “dam” will capture water and allow it to be slowly absorbed by the soil. Or, better yet, lay a soaker hose a few inches away from the base of the plant so you can just turn it on to ensure your transplant gets off to a good start.
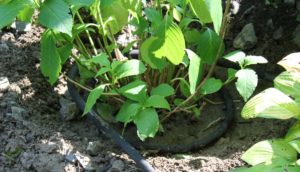
Big leaf hydrangea with soaker hose at base before being mulched.
KEEP AN EYE ON SOIL MOISTURE
Be aware that this newly planted hydrangea won’t have a strong root system. Keep a close watch on your plant to be sure it gets enough water, particularly now at the beginning of the season as it heads into warm temperatures. Watch the weather, do some knuckle tests, use your rain gauge, and be ready to provide supplemental irrigation if there is a shortfall of natural precipitation. Pay attention to it, especially when things get dry. Those new roots are working hard to get established but may not be able to take up the needed moisture to assure plant longevity.
During the following two summers your plant may need a little more attention while those fragile roots are still getting established. Be prepared to spritz the foliage early in the day if the plant wilts, even if the soil at its base is moist to the touch.
Don’t be disappointed if your newly planted hydrangea doesn’t flower on time for its next cycle. It needs to focus on establishing roots vs. flowers. That could take the plant a full season to get established in its new home.
PLANTING HYDRANGEAS AND MULCH
The last part of the process is to mulch your newly planted hydrangea. You want to put down a 2- to 4-inch layer of mulch. Wood chips, shredded leaves, cedar mulch, etc. will all work fine. The kind of hydrangea you have and where it is sited may determine the proper mulch. There is a chapter on mulching in my book SUCCESS WITH HYDRANGEAS that gives specifics on what type of mulch is best for each kind of hydrangea. Mulch will keep the soil moist and protect the roots. It also helps to prevent weeds and keep the soil temperature even as your plant experiences seasonal ups and downs. You can find a dedicated chapter in my book about planting and transplanting hydrangeas.
WHAT ABOUT GIFT PLANTS AND HYDRANGEAS IN CONTAINERS
On the other hand, if you have a containerized plant that has leafed out, you want to wait until you are past your last frost date regardless of soil temp. As you well know, late spring season cold snaps happen regularly, and they will zap your plant and set it back. You can keep that plant in an attached garage or basement until the time is right.
When it comes to plants we are now seeing in grocery stores, box stores, etc., don’t rush to get them in the ground. They have been forced to be in flower for spring holidays and generally are not hardy enough for outdoor conditions. Enjoy them as houseplants and then trash them in a few weeks when the flowers have died.
WILDLIFE CONTROL

Deer Defeat protects hydrangeas from deer and other wildlife
Most, if not all of the snow has melted, and the critters are hungry and roaming. Luckily for you, management at Deer Defeat noticed my affinity for their product and are offering a discount to my readers who order directly from them. They have agreed to give you free shipping in the continental U.S. between now and Easter (April 5, 2026). When you get on the Deer Defeat website, the code to use is HYDRANGEAREADERS (it’s not case sensitive). The code provides free shipping for Deer Defeat repellent until Easter. So time is running out to get this order in. I know that all deer herds are different and that from one year to the next, they change their habits.
I’m hopeful this product will work as well for you as it does for me. Note that I derive no income from your purchase.
NEW HYDRANGEA PRUNING BOOK ABOUT TO LAUNCH
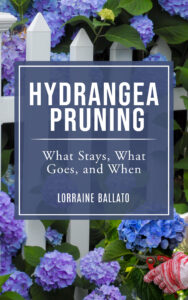
The cover of my next book about hydrangea pruning.
I am close to getting this new pruning book out into the world and have already received very positive feedback about it. I will let you know when it’s available for pre-orders (essentially a reservation system). Hydrangea pruning seems to be the one garden task that challenges us gardeners.
UPCOMING PUBLIC TALKS

Lorraine Ballato delivering one of her hydrangea presentations
As we close out the first quarter of the 2026, I am looking forward to the public talks I’ll be giving in April, and May. I will be selling signed copies of my new hydrangea pruning book at these events as well as the award-winning Success With Hydrangeas, A Gardener’s Guide.
April 8: Town and Country Garden Club, Newtown, CT: Smarter Gardening, free.
May 2: Greenwich Botanical Center, Greenwich CT: As part of the May Market (a really fun and superb garden event!), I will be talking about roses: No Fuss Roses -Blooms Without the Drama,
May 9: New York Botanical Garden, Bronx, NY: Low Maintenance Gardening, fee-based.
I look forward to seeing you. Tell/bring your friends!
Thanks for reading.
6 Secrets for Stunning Hydrangea Flowers
Get my FREE mini-guide with 6 fool-proof tips showing how to grow hydrangeas that produce the most amazing flowers.
No spam - I promise!