A typical activity this early in the season is transplanting hydrangeas. I just finished doing some of that myself and, like you, hope that my hydrangea will like its new home. So here’s what I recommend you do if you are in the same boat.
TRANSPLANTING HYDRANGEAS: CHECK TO SEE IF YOUR PLANT IS DORMANT
In most cases, you want to transplant your hydrangea when a plant is dormant. If the leaves are out your plant is definitely not dormant. Of course, you can “break” that rule, but doing so puts more stress on the plant and you, the gardener.
In the Northern hemisphere, you should be able to transplant just about all of your hydrangeas now before the season gets too far along. The exceptions are woodland/smooth (arborescens) hydrangeas, and climbing hydrangeas which are rapidly leafing out. Most of my big leaf (macrophylla), mountain (serrata), and oak leaf (quercifolia) hydrangeas are barely out. I’m grateful that the panicle varieties like ‘Limelight’ are still asleep so I can move them now if needed.
Keep in mind that spring transplants will be much more dependent on you, the gardener, to provide sufficient water for the entire summer. If you don’t have some kind of automatic watering system, hand watering can get old very fast as the season marches on, especially if it is a dry one.
Here are some other general guidelines.
PREPARE THE NEW SITE
Once you have chosen the best site based on your hydrangea’s needs (allowing for sunlight, soil, drainage, and moisture conditions), dig the receiving hole first to be sure it can accommodate the rootball. I can’t tell you how many times I have hit “foundation” rocks (read GINORMOUS) that have thwarted my planting plans!

Dig the new hole first for your hydrangea transplant
If you’re okay on the receiving end, fill the hole with water and let it drain to be sure when transplanting your hydrangea that your drainage is adequate. If it empties in less than an hour, your hydrangea transplant will either die of thirst or you will be exhausted trying to keep it hydrated. This rapid drainage is an indication that your soil isn’t water-retentive and needs to be amended to hold moisture. Or maybe you need to pick a different site.
If it takes a few hours to empty, you should be okay to transplant your hydrangea into this hole. If it takes a day or more to empty, your soil is much too heavy in that spot. You will need to seriously amend it, or find a better site.
SOIL HEALTH: A GOOD TIME TO CONSIDER AMENDMENTS
When transplanting hydrangeas, you might want to do a soil test to ensure you have the right conditions for your plant. Analyze your results to get clear on what amendments you may have to add to bring that space up to standards.
Transplanting is traumatic for a plant so I always recommend using some sort of mycorrhizae additive in the fill soil. It helps reduce transplant shock and establish roots. Your local independent garden center can guide you to these additives. There are many choices on the market. Simply follow the label directions to help your hydrangea make a successful transition.
The only other amendments to add at transplant time are compost or composted manure and whatever you have decided to apply to adjust the pH, if necessary.
PREPARE THE HYDRANGEA THAT YOU’RE MOVING
Water the plant the night before moving it to ensure that it is well hydrated. Depending on the size of your plant, a wheelbarrow may be necessary plus some burlap and/or a tarp. A garden buddy for an extra pair of hands and a strong back will also come in handy.
Be aware that some plants can open up and splay once they have been dug completely around their base at the drip line. If your plant is large and you want to keep it that size, wrap it loosely with a bungee cord or somehow tie it to keep it together.
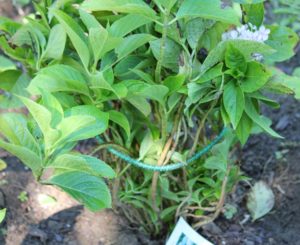
Hydrangea tied with a bungee cord to keep it from separating
DIG IT UP!
Carefully use your transplant spade to gently dig around the edges of your plant at the drip line without actually digging it up. Then go deeper and start to coax the plant out of the ground. You are trying to keep as much of the rootball intact as possible. Slide the burlap under the plant and tie it around the rootball to keep it together. Now is when the plant might split, so you want to slide it onto that tarp and avoid actually lifting it. Here’s the moment when your garden buddy can help you as you either drag the plant over to the new hole or lift it into the wheelbarrow for transport.
MAKE THE MOVE
By now your newly dug planting hole should be ready to accept its new tenant. The water drainage has been tested, the proper amendments have been added based on your soil test, and your plant is good to go.
PUDDLING IT IN
Now “puddle the plant in.” “Puddling in” is a bit of a throwback to your childhood mud-playing days, except now it’s a useful planting technique. Put your plant into the very wet hole that has just finished draining. The hole might even have some water still in the bottom of it—with some of the backfill soil. Then water the plant and the backfill lightly to get a good muddy mix going. Tamp it slightly to remove the air pockets. Let that set for a bit, and then repeat that process until the plant is completely in the ground. It’s OK if there is a bit of water sitting at its crown. That should slowly percolate down to the roots. This puddling process not only waters the plant well, but also eliminates air pockets during and after backfilling.
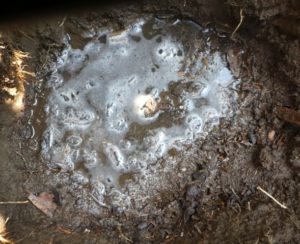
Receiving hole for transplant with water for “puddling in”
DEPTH OF THE HOLE
Make sure the plant doesn’t sit deeper in its new hole than it was before you moved it. The only exception to this is if the plant had been heaved out of its previous spot for some reason such as burrowing creatures or freezing temperatures.
Amendments should be thoroughly integrated into the backsoil and the planting hole along with the native soil. No peat moss, Holly-tone®, Miracid®, or anything else should be added at this time.
Create a firm soil collar about 2 inches high and about 4 inches out from the base of the plant. This “dam” will capture water and allow it to be slowly absorbed by the soil. Or, better yet, lay a soaker hose a few inches away from the base of the plant so you can just turn it on to ensure your transplant gets off to a good start.
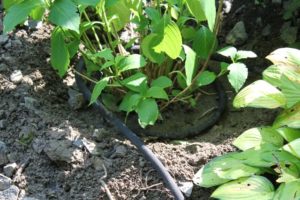
Hydrangea transplant with soaker hose installed at its base
TRANSPLANTING HYDRANGEAS: WHAT ABOUT MULCH
The last part of the transplant process is to mulch your newly transplanted hydrangea. You want to put down a 2- to 4-inch layer of mulch. Stones, wood chips, shredded leaves, cedar mulch, etc. will all work fine. The kind of hydrangea you have and where you moved it to will determine the proper mulch. There is a chapter on mulching in my book SUCCESS WITH HYDRANGEAS that gives specifics on what type of mulch is best for each kind of hydrangea. Mulch will keep the soil moist and protect the roots. It also helps to keep the soil temperature even as your plant goes into dormancy and experiences seasonal ups and downs.
AFTERCARE FOR THE TRANSPLANT
Keep a close watch on your plant after you move it to be sure it gets enough water, particularly at the end of the season as it heads into dormancy. Watch the weather, do some knuckle tests, use your rain gauge, and be ready to provide supplemental irrigation if there is a shortfall of natural precipitation.
During the following two summers your transplant may need a little more attention while those fragile roots are still getting established. Be prepared to spritz the foliage if the plant wilts even if the soil at its base is moist to the touch.
Don’t be disappointed if your hydrangea transplant doesn’t flower on time for its next cycle. It needs to focus on establishing roots vs. flowers. That could take the plant a full season to get established in its new home.
IDEA FOR A MOTHER’S DAY GIFT
My internationally best-selling hydrangea book would make a terrific Mother’s Day gift for the gardening mama in your life. You can easily order a SIGNED COPY from my site. But even better is a copy that is inscribed to the recipient. Just tell me how you want that to read on your order and I will be thrilled to accommodate that request. The book along with a potted/gift hydrangea (which is available everywhere right now) would be a big hit.
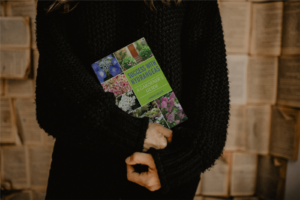
Gardener holding book, Success With Hydrangeas
UPCOMING PUBLIC TALKS
I am continuing to book talks, both virtual and live (HOORAY!!!). If you are interested in having me speak to your group, just click HERE and you will be taken to the “Contact Me” page of my site to begin our dialogue. I cover lots of other topics besides hydrangeas, as you will see when you click on “SPEAKING TOPICS”. All my talks are 5-star rated, so you won’t be disappointed.
Here are my upcoming public talks for the next few weeks:
May 7, 10.00 am – 1 pm: Shady Characters, New York Botanical Garden. Format: In person. Cost: Member – $65; Non-member – $69. Learn about shade gardening, what to do and how to do it.
For longer range planning, I am pleased to tell you that I am speaking on July 8 at this year’s Cape Cod Hydrangea Festival. The details of the full program are still being developed, but if you want to be on the Cape for its prime hydrangea season, now is the time to get your ducks lined up and maybe make hotel arrangements.
![]()
I look forward to seeing you. Tell/bring your friends.
6 Secrets for Stunning Hydrangea Flowers
Get my FREE mini-guide with 6 fool-proof tips showing how to grow hydrangeas that produce the most amazing flowers.
No spam - I promise!