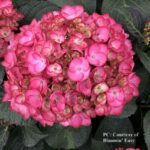
Hydrangea macrophylla ‘Fairtrail Bride’ in a container displays a unique cascading growing habit
If you live in the northern hemisphere it’s time to think about bringing in your containerized hydrangeas for winter. Here’s what you need to do and when.
WHEN YOU DON’T NEED TO BRING YOUR CONTAINERIZED HYDRANGEA INSIDE
Note there are a few conditions when you don’t need to bring your containerized hydrangeas in:
- You are in a frost- and freeze-free location;
- Your containers are freeze proof AND
- Your containerized hydrangea is 2 zones hardier than where you have it;
- You can adequately insulate your container to prevent the contents from freezing;
- Your hydrangea flowers on new wood (woodland and panicle varieties).
WHERE TO STORE YOUR CONTAINERIZED HYDRANGEA IN WINTER
To winter protect your hydrangeas in containers, first find a storage place that is unheated but protected from deep winter weather. An attached garage or basement works fine. Sheds are sometimes useful if they don’t get below freezing. If the shed is not attached, forget about it.
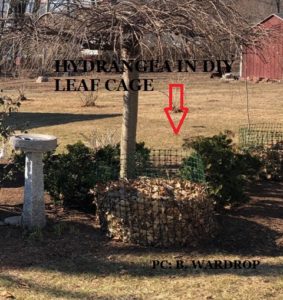
If you want to leave the container outside and insulate it, there are many options. You can build a cage with a top using chicken wire and stuff it with leaves. You can wrap your containerized hydrangea in bubble wrap, foam, or other insulating materials. Be careful with these two as snow and ice can build up on the top and crush your plant. You can make a top from Styrofoam and secure it with a bungee cord. Keep an extra bag of leaves around to top off the plant from time to time to compensate for the inevitable settling that will occur. If you can store your insulated plant under a porch or some other structure with overhead protection it will be better off.
TREAT YOUR CONTAINERIZED HYDRANGEA FOR INSECTS BEFORE BRINGING IT IN
One of the most important things to do is ensure there are no insects in your containerized hydrangea. A thorough spray and a couple of soil drenches with an organic insecticide will do the job. Neem oil at 70% and spinosad are two options for you. You need to do this at least twice. The first application – the spray — will take care of the live insects, and the second – a soil drench — should deal with remaining larvae and eggs that are yet to hatch. Follow the directions on the label.

Spinosad Organic Insecticide

70% Neem Oil Organic Insecticide
WAYS TO INSULATE YOUR CONTAINERIZED HYDRANGEA IN WINTER
Lots of gardeners take great pains to insulate their plants, especially if they don’t have someplace indoors to store it. Here are a couple of ideas for you.
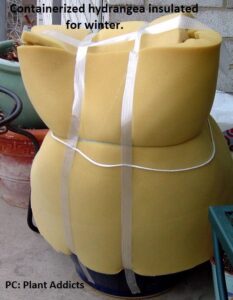
Containerized hydrangea insulated for winter.
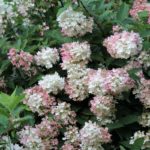
Hydrangea insulated with leaves and no top works well for snowless areas.
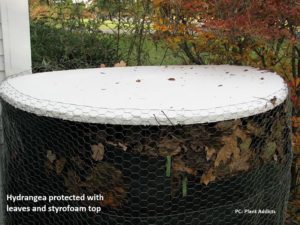
Hydrangea Insulated With Top Covered
WATERING YOUR CONTAINERIZED HYDRANGEA OVER THE WINTER
Don’t forget to water your plant from time to time. About a cup (8 ounces) of water a week should do the job. Be sure you test if it’s enough or too much. Stick your finger in the soil to ensure it is wet at the second knuckle (the knuckle test). If not, give it a drink. If the water quickly drains out the bottom, it might be too wet. Learn and adjust.
EXACTLY WHEN TO BRING YOUR CONTAINERIZED HYDRANGEA IN FROM THE WINTER WEATHER
Keep in mind the science behind hydrangea bud set. Both big leaf (macrophylla) and mountain (serrata) hydrangeas set their buds when night temps are consistently below 60 degree F. This needs to be for at least 6 weeks, ideally 8. So let your plant chill properly, unless your storage area is at 60 degrees F or less. I keep a thermometer in the basement just to be sure and I can tell you with certainty that temps down there don’t get below 60 degrees F, ever.
WHEN TO “OPEN UP’ YOUR CONTAINERIZED HYDRANGEA
If you store your plant inside, watch it to see when the leaf nodes begin to swell (usually around March 1 for me). That’s the time you can gradually introduce it to whatever light it is getting. It may also need more water as it breaks dormancy. Treat it gently. If it’s not too cold, you can move it outside into a shady place to gradually introduce it to the UV rays of the sun which are very strong. It should take about a week to 10 days. Each day you can give it a bit more sun. If you can catch a string of cloudy days plan to start the process then.
With an insulated plant that has spent the winter outside, you must wait until all danger of frost is passed before gradually removing the insulation. When you do that – carefully — you will see leaves and buds which are tender and hardly green (no photosynthesis takes place when there is no light). Again, treat it gently and move it outside into a shady place for a few days.
Be prepared to bring your plant in/protect it if there is stormy weather or unseasonal cold temps forecasted.
So that’s all there is to it. You won’t be sorry you took the time to do this work when your plant is full of flowers next June.
UPCOMING TALKS

Audience listening to speaker
I have an on-line New York Botanical Garden class on Saturday, October 1: Weatherproof Hydrangeas. This class focuses on growing hydrangeas when you garden in USDA Zones 5 and colder. Of course, the info is just as useful for warm climate gardeners. We’ll cover specific techniques to coax flowers from sometimes reluctant plants as well as which hydrangeas are most dependable. Go HERE to learn more.
I look forward to seeing you. Tell/bring your friends.
Thank you for reading.
6 Secrets for Stunning Hydrangea Flowers
Get my FREE mini-guide with 6 fool-proof tips showing how to grow hydrangeas that produce the most amazing flowers.
No spam - I promise!